Looking for things to draw on Procreate? Follow this beginner’s tutorial.
Procreate Drawing Ideas | Things to Draw on Procreate | iPad Art
Using Procreate to Make Watercolor Geodes on your iPad
So you’ve just purchased the Procreate app for your iPad. Now what? Enjoy a FREE beginner’s Procreate class!
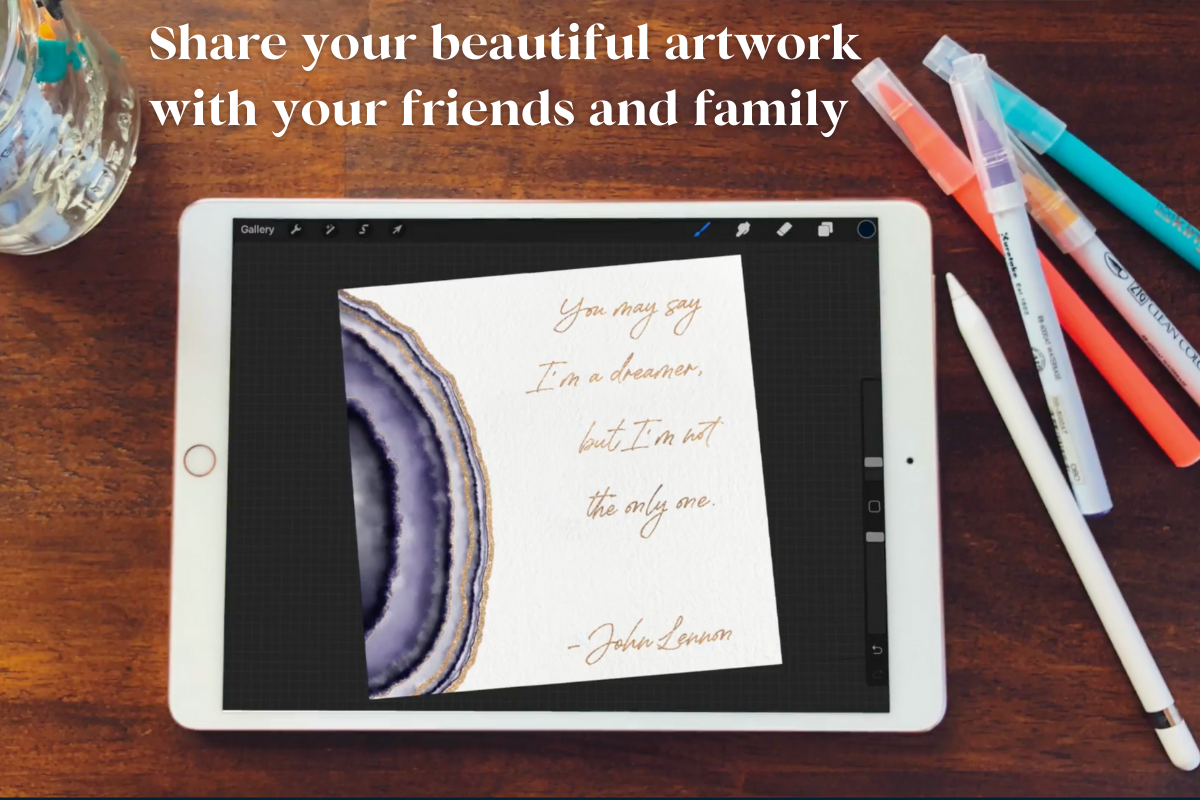
Using your Apple Pencil, and FREE Perch Handmade Procreate brushes, you will learn how to create a watercolor-like painting of a geode. Then, using a simple technique and downloading the glitter background, you will add some shimmer to your watercolor to make it pop! Finally, finish it off with a beautiful song lyric or quote.
In this beginner tutorial for Procreate on the iPad, you will learn:
Formatting a canvas
Downloading materials
All about brushes
Blending techniques
Adding text
Adding shimmer!
Hey, Katie here! I am an Oregon Coast-based Course Creator and T-shirt Designer. I specialize in creating and teaching on my iPad.
I can't wait to get started! So let's begin.
Supplies
iPad
Procreate App
Apple Pencil
Downloads:
Perch Handmade Brushes
Big Cloud Brush
Small Cloud Brush
Perch Handmade Watercolor Paper
Perch handmade Glitter Paper
Watercolor Geode Color Palette
Make sure to download all your files and add them to a file named Geode Resources. This is where you're going to keep your color palette, your gold glitter background, your watercolor paper, and your brushes that we'll be using in this tutorial.
When you click on the brushes, it imports them immediately into your Procreate app. Look for them in the Brush Library called IMPORTED.
Step 1: Finding Your Inspiration on Color Hunt and Pinterest
I love ColorHunt because its colors are cohesive. You can click on the palettes and save them into your files to send them off into Procreate for use later.
You'll also find my Pinterest page Geode Inspirations. There are so many things to choose from for getting your inspiration for this project. Today I’m going to stick with just a single color combination.
Step 2: Setting Up Your Canvas
First, open Procreate and add a new canvas by hitting the Plus (+) sign in the Top Right corner, then the smaller (+) sign, and set your canvas size to 10 inches x 10 inches and 300 DPI.
Once I have the canvas open, I'll hit the Wrench Tool> Canvas> Canvas Information> About this Artwork and Rename: Watercolor Geode Master Copy. This is also where I will add my Logo and Signature if I plan to share this file with others, as a copywrite for my project.
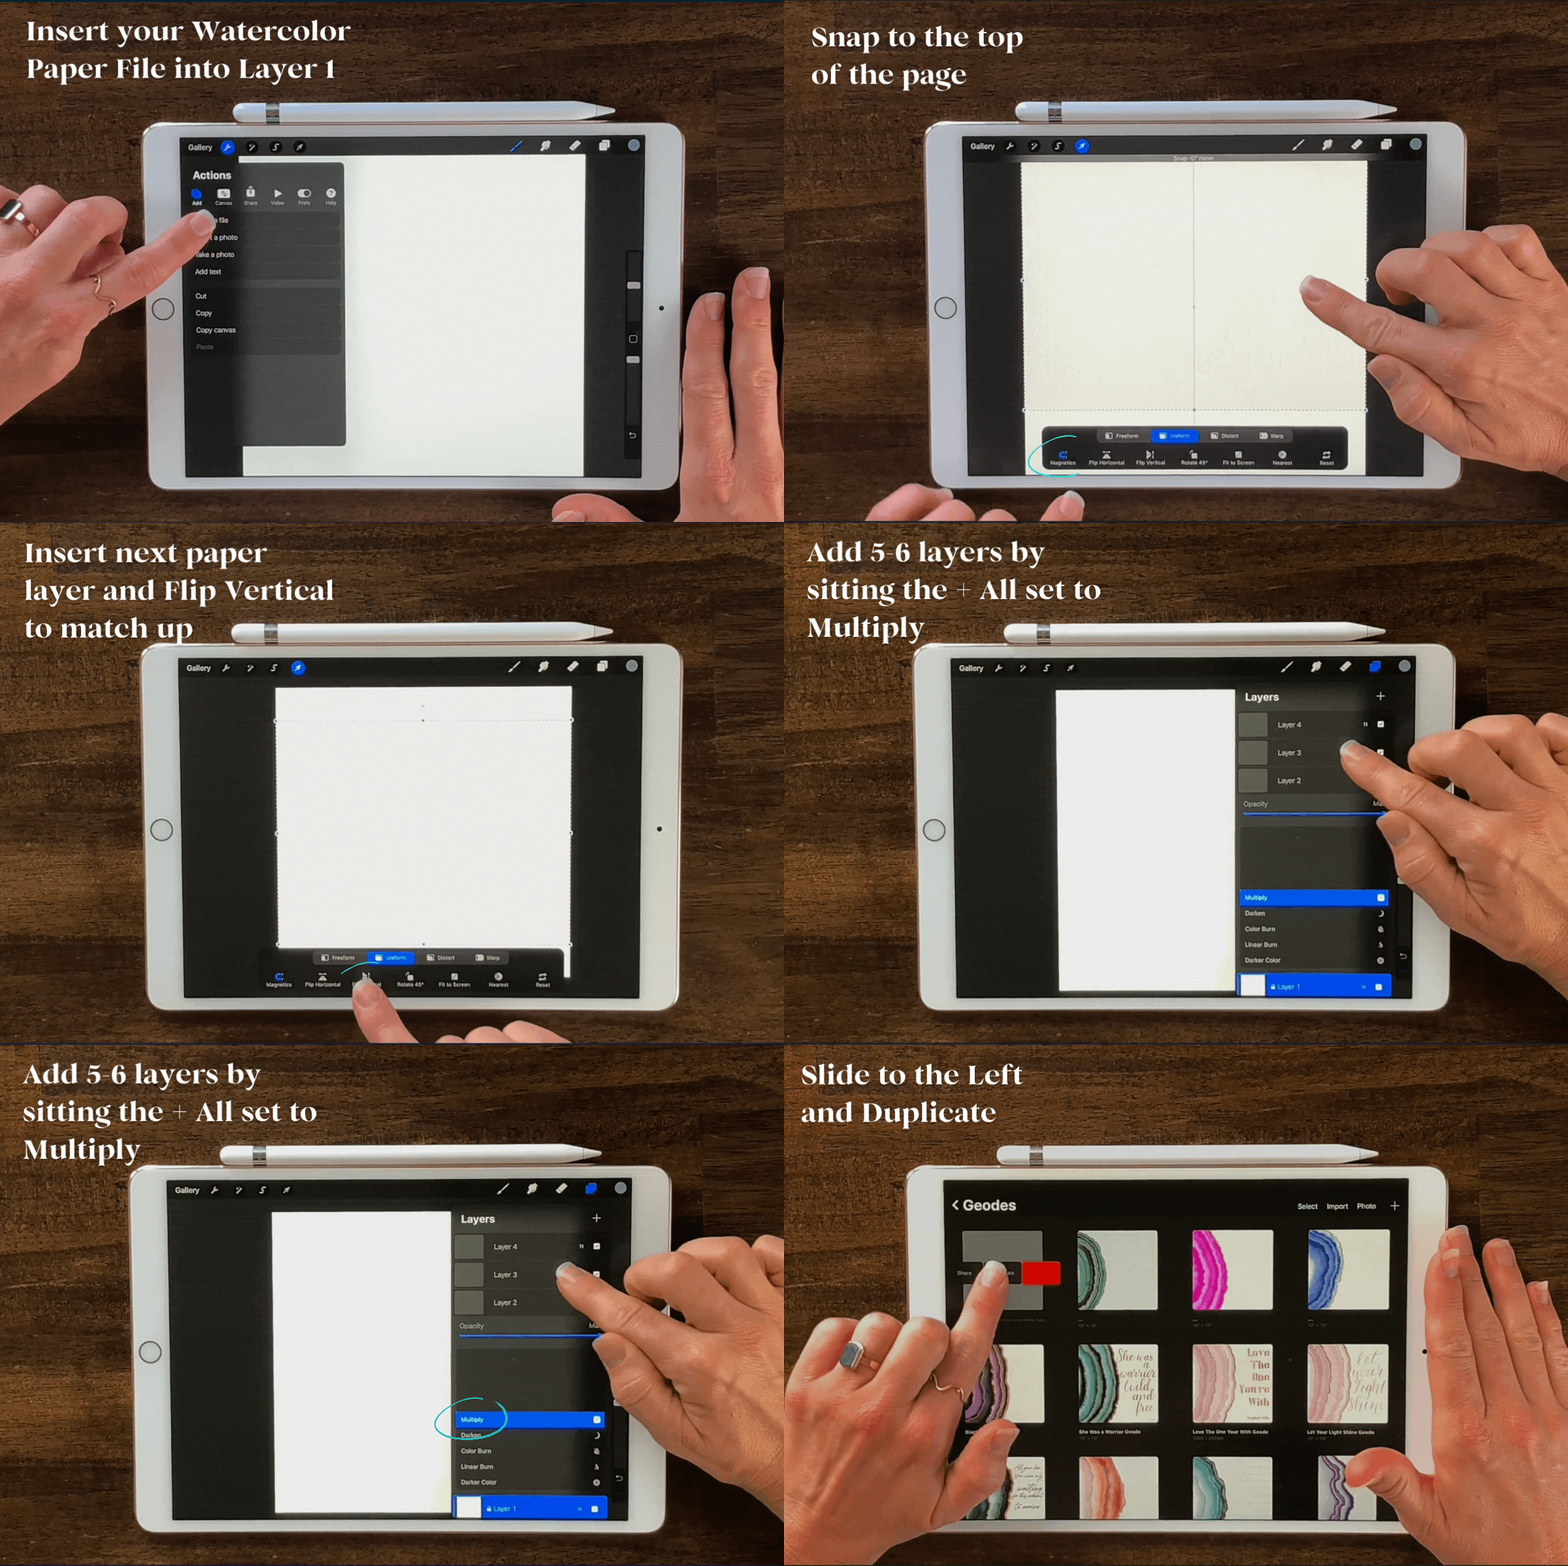
Set up your layers as such:
Add> Insert File: Insert your Watercolor Paper File into Layer 1
Snap to the Top of the page (Snapping + Magnetics turned on)
Insert the next paper layer, and Flip Vertical to match up
Add 5-6 layers by sitting the (+) All set to Multiply
Add> Insert File: Insert your Glitter Paper
Snap to the Top Left of the page
Insert 3 more times to fill your page
Flip Horizontal and/or Vertical to match the sides, then snap into place
Pinch the 4 layers with 2 fingers to make into 1 layer
Lock that layer by Sliding to the Left and toggling off
Add> Outline layer
Add> Quote layer
Go back to Gallery> Slide to the Left> Duplicate
We don't want to work on the Original Master Copy, so be sure to rename the new copy and work on that one. Keep the Master Copy so you can recreate this project easily later. You will definitely want to!
Step 3: Building Your Brush Gallery
Now that you've got your canvas all set up, we're going to build up our brush library. This makes it ready and available in the future when you want to make a geode, you know where your brushes are.
First, we'll click on our brush icon> Click the Blue (+) and Rename: Geode. Then, scroll to find the IMPORTED brushes. This is where your PHM Cloud Brushes will be after you download them. The next part is tricky so go slow until you have it figured out.
Hold down on the 1st brush until it begins to hover. DO NOT let go. Then with your other hand Scroll to find the Geode Library file we just renamed, and Click on Geode with that other hand/finger.
You should now be able to drop the 1st brush into that file. Fingers crossed it works for you. Keep trying if it doesn't! It took me forever to completely figure this out.
Next, go to the Water Brush library file that came on your iPad.
Find the brushes:
Water Bleed
Wet Sponge
Wet Glaze
Wash
Duplicate your Water Brushes before moving them.
Slide to the left to duplicate.
Once duplicated, Slide to the Right to Group.
Hold and hover to move into your Geode brush file, like before.
Now we have our whole brush gallery set up for our geode brushes, and we're ready to begin!
Step 4: Creating Your Geode with Layers and Blending
So we're at the exciting part. We get to start creating your geode, so let's begin. Make sure the color palette you downloaded is dropped into the color library. Your color history will be saved as well if you change them up at any time. I've added the Geode Palette jpeg so you can screenshot it if you'd like.
Here we go!
First, let's pick out which brush to use. I like to use a small cloud brush to begin.
I like to bring my opacity down to about 70% because I don't want it to be too dark.
I'll use size 15% to start as well.
Layer 2: Let's start by making a jagged half-circle (just above the watercolor paper).
Layer 3: Use the Wet Glaze brush at 20%, and make another jagged half-circle just beyond the 1st half-circle. Remember your layers are set to multiply, so you'll notice the watercolor paper coming through with this brush better.
Layers 4-6(or more): Keep going back and forth with each brush, in each separate layer. Make sure you have that contrast between each layer. This is where a shaky hand is okay too!
Build each layer, getting thinner as you move outward until you like the way it's looking. About 1/3 of the page.
Let's begin to start blending the layers.
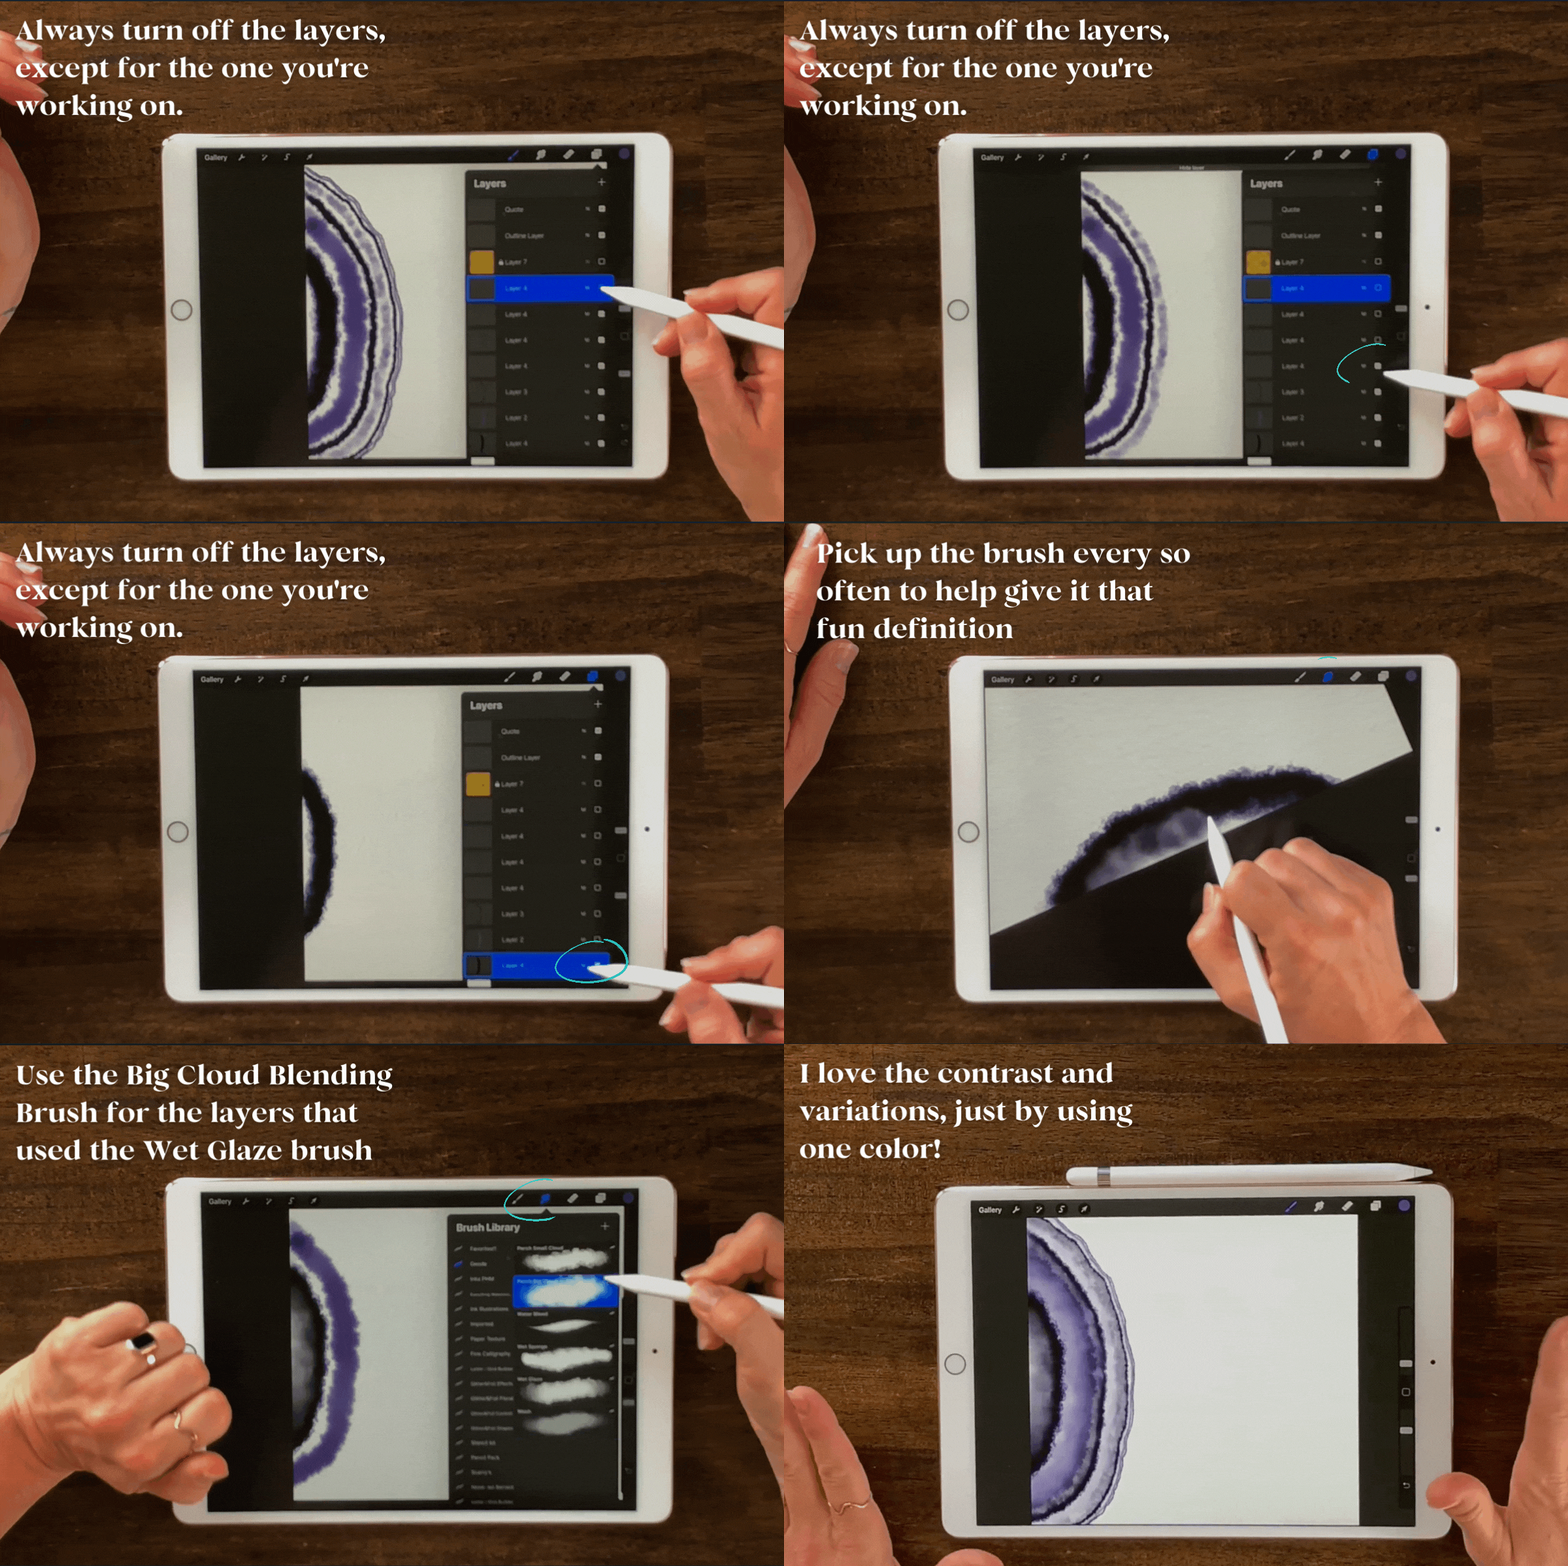
Always turn off the layers, except for the one you're working on. Maybe the one above that layer too. So you can see how it's blending.
Use the Wash Brush in Blend Mode and pick up the brush every so often to help give it that fun definition.
Let's open up the next layer. This is when I like to keep the layers open so I can see how it blends into the next layer. I like to use the Big Cloud Blending Brush for the layers I used the Wet Glaze brush for the Geode. Does that make sense? I hope so.
Keep going like this between each layer until you have a finished, blended Geode.
So when you finished, make sure you go back and look at all your layers and make sure everything looks just how you want it. I love the contrast and variations, just by using one color!
Step 5: Adding the Shimmer + Text
Now comes the fun part, adding shimmer and text to your Geode. I love using song lyrics when I'm adding text because sometimes the quotes come across as kitschy, and I love music.
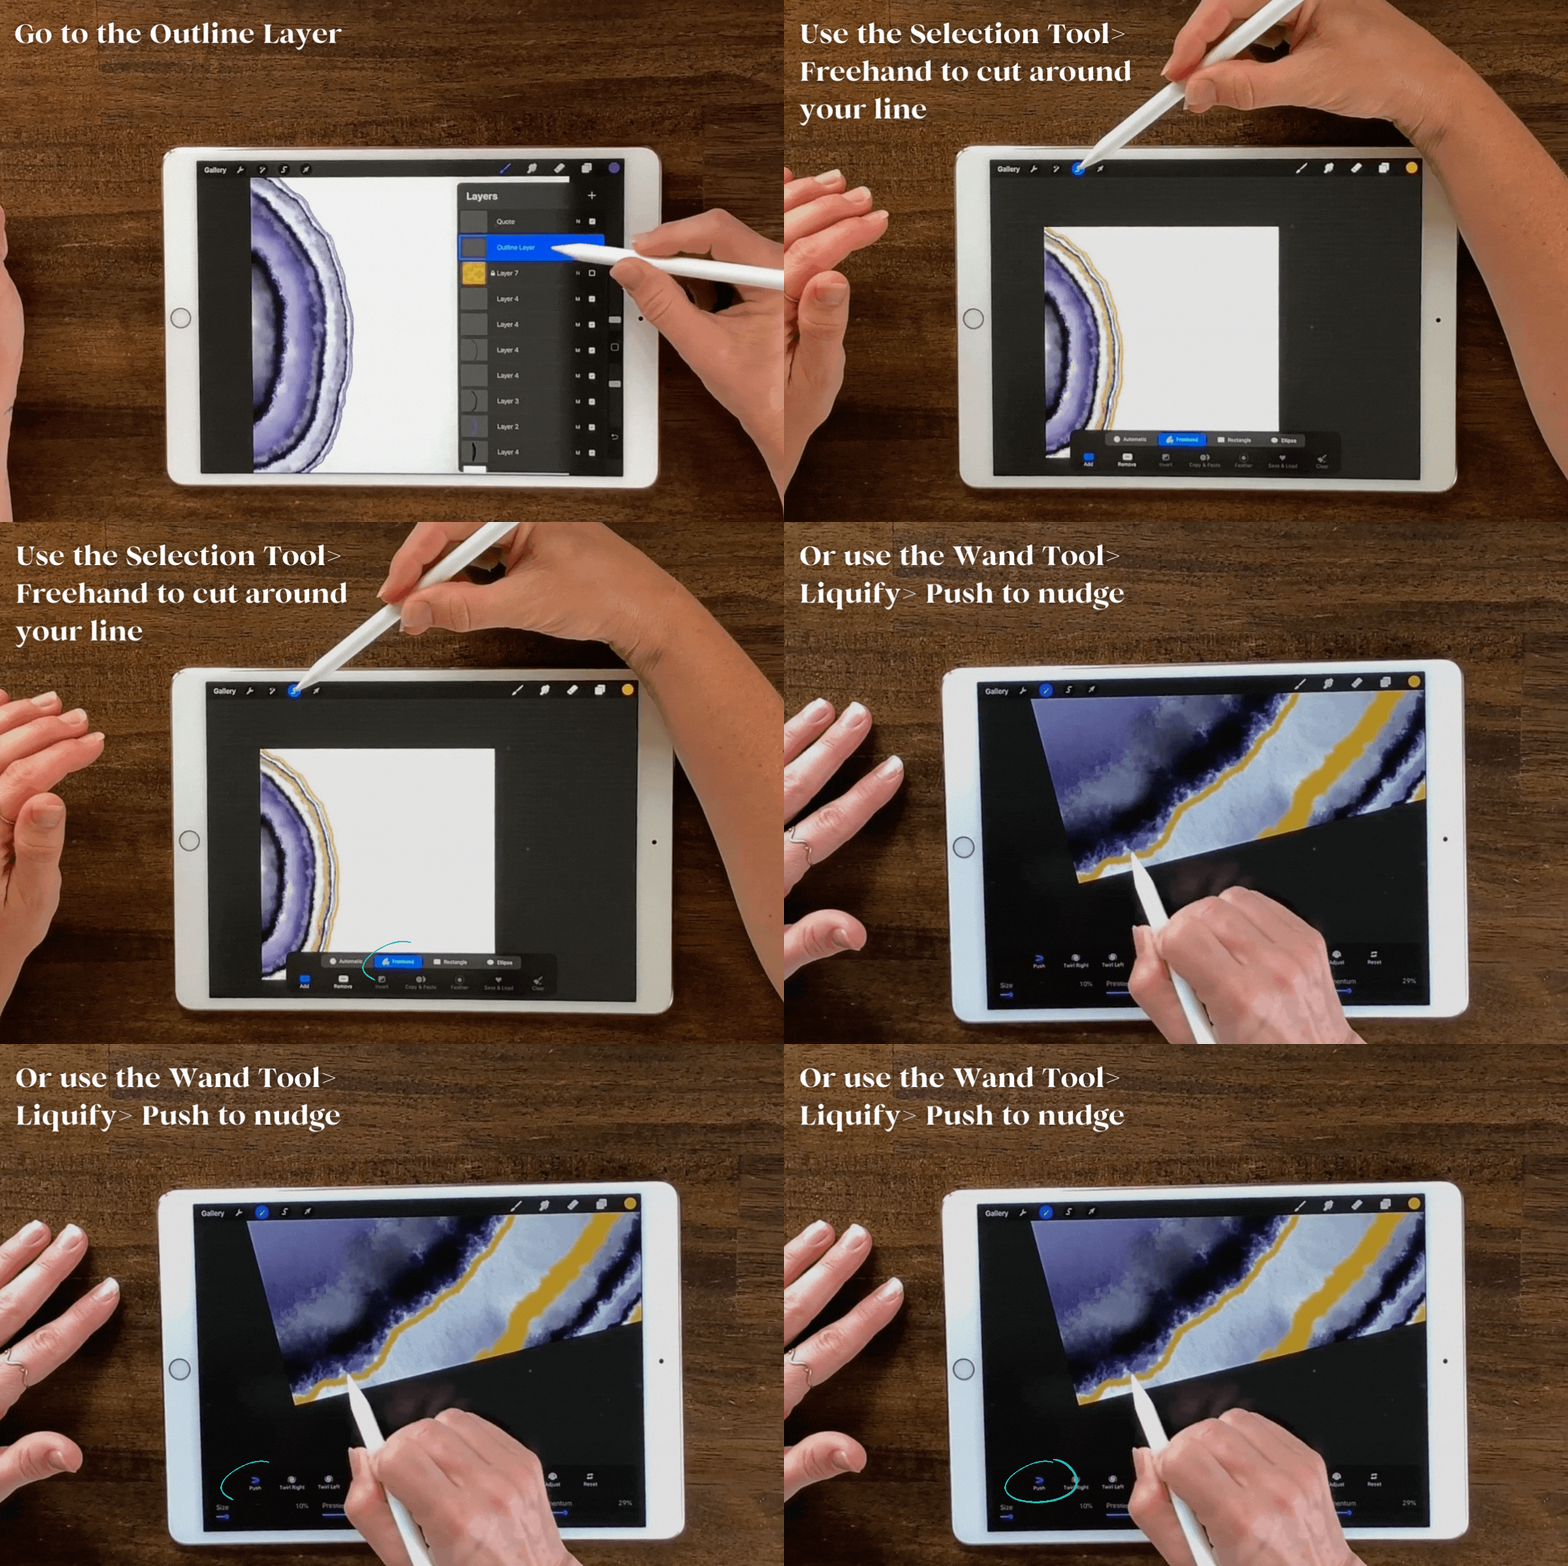
First, we're going to go to that Outline Layer. We'll pick the gold color from our palette. Don't worry, it's only for the outline. I always like to use the Wet Glaze Brush set to 4% for the outline. Keep that opacity at 100%! This way it'll show the glitter properly later on.
Now, follow along the Geode you just made. We're not covering up the outside edge, but we're getting pretty darn close.
Add more outlines along the different edges, bringing down the size as you go.
If you need to move one of the lines closer, you can use the Selection Tool> Freehand to cut around your line.
Then use the Move Tool to nudge that line closer to your Geode edge without going over it.
You can also use the Wand Tool> Liquify> Push to nudge your outlines a bit closer to your Geode edges.
Here comes the fun part, adding text!
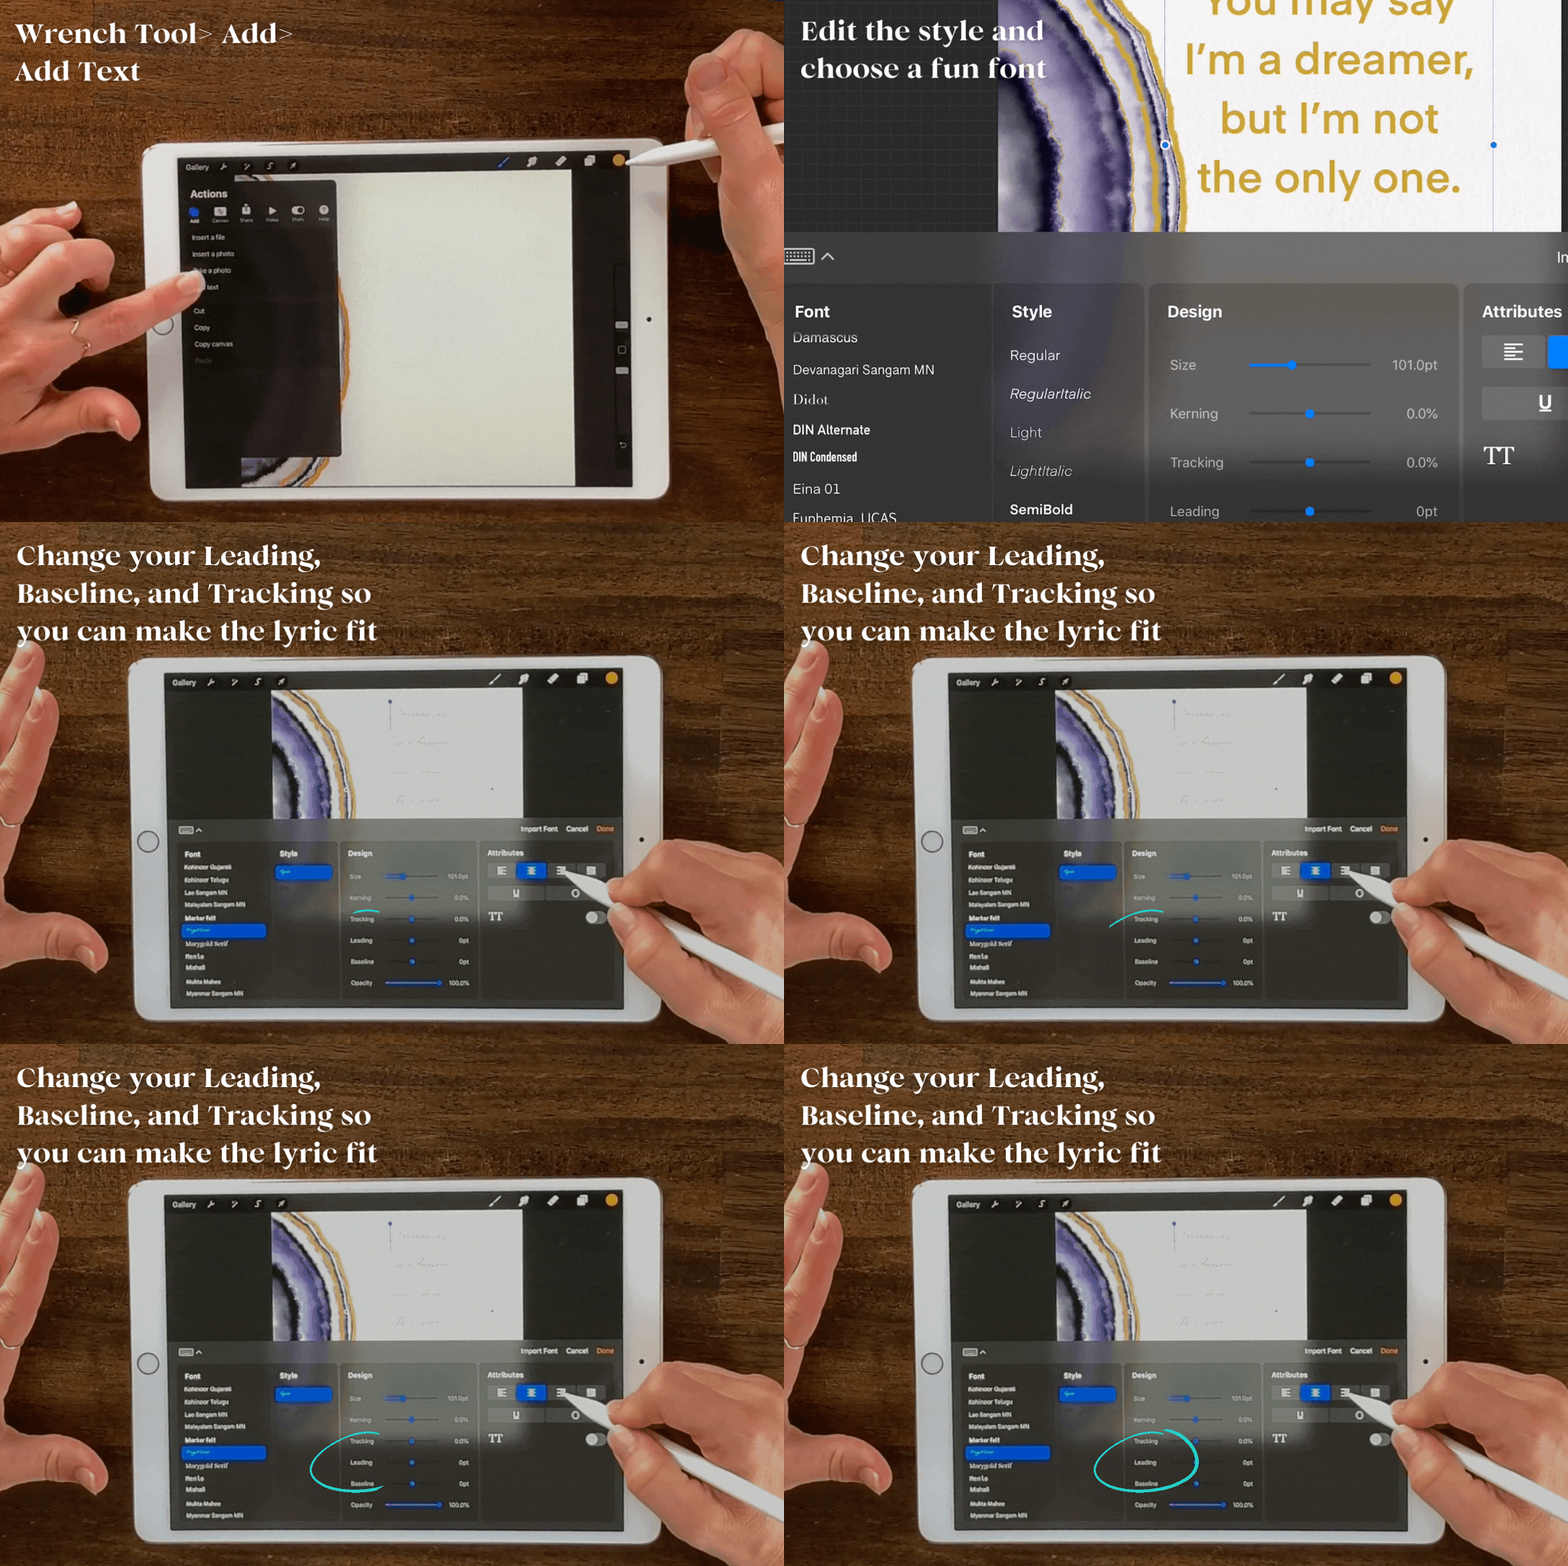
We do that by staying on the Gold Outline Layer. Go over to the Wrench Tool> Add> Add Text.
I love to use beautiful song lyrics. Always remember to add who wrote your lyrics, so you don't have any copy infringements.
Next, we can edit the style and choose a fun font.
You can change your Leading, Baseline, and Tracking so you can make the lyric fit. Every font will be a bit different, so you just have to tweak it.
It's time to add the shimmer!
What we're going to do is click on the Outline Layer> Select> Invert.
And this is where it gets a little tricky again. We want to have the yellow with the little lines on it so we know that's selected.
We'll go into the Glitter Layer (without getting off select), and unlock lock it.
Tap that layer again and then hit Clear. This will take away everything that wasn't selected.
Toggle off the Outline Layer and... tada!!
We have a beautiful glitter, shimmery outline, and all of our words with glitter too!
Now comes the fun part, sharing your beautiful artwork with your friends and family. Hit the Share button as a JPEG, then you can save the image. You're now able to send it off and share it as a text or in an email. Maybe you want to send it to your favorite online printer.
Have fun making these easy Watercolor Geodes. I'd love to see all of your creations. If you post to Instagram, be sure to use the #CreatingWithPHM so I can showcase your work in my stories.
Let's do this together!
Are you looking to watch the video tutorial? Join the class on Skillshare, and enjoy 1 Month of FREE access to all of my classes and more! {free for new students}
Find more information HERE!


